Friday, 29 April 2016

Samsung Galaxy A3 SM-A300H Firmware

Samsung Galaxy A3 SM-A300H

http://goo.gl/Hafv10

Any problem during update please ask me..                                                 ziashaheen  


Android 5.1.1 Lollipop for GT-N7000

Android 5.1.1 Lollipop for GT-N7000

Note: International Business Times is not responsible if something goes wrong. Users should proceed at your own risk.

Step 1: Download Paranoid Android 5.1.1 ROM for Samsung Galaxy Note.Step 2: Download Google Apps on your computer.Step 3: Connect the Samsung Galaxy Note to your computer via a USB cable and transfer the ROM file and package file to the SD card gapps device. Make sure the files are saved in the root of the SD card, and not in any other folder.Step 4: Disconnect the Galaxy Note and enter recovery mode by pressing and holding the volume up, home and power buttons simultaneously.Step 5: ". Toallita replacement data / factory" Once the phone is in recovery mode, perform a factory reset by selecting Now select "wipe cache partition."Step 6: From CWM recovery, go to "Advanced" and select "wipe Dalvik cache."Step 7: Return to recovery menu and select "install zip from SD card."Step 8: Select Use the volume keys to scroll to the ROM zip file and select it using the Power button "choose zip from sdcard.".Step 9: Repeat the previous step for Google and install applications on the phone.Step 10: After installation is complete, return to the main recovery menu and select "reboot system now".


Any problem during update please ask me..                                                 ziashaheen  

How to Root QMobile Noir Android Mobiles and Tablets using Framaroot 1.9.3


How to Root QMobile Noir Android Mobiles and Tablets using Framaroot 1.9.3


How Root QMobile Noir smartphones using Framaroot 1.9.3:

      First, download the apk Framaroot through this link.
      Connect your device with your PC.
      Place the Framaroot.apk storage device.
      Disconnect the device.
      Now, go to "Phone Settings -> Security -> See" Installing unknown sources'
      Now is the time to install the application. Use any file manager and install the apk.
      After completion, launch the application. On the screen, you get two options execution exploit that is installed superuser or install Super SU with the option of Aragorn.
      Most people recommend selecting "Install SuperSU 'option from the dropdown menu and select the root' Aragorn 'exploit (if available). If any option does not work, you can check other options.


Any problem during update please ask me..                                                 ziashaheen  

Saturday, 23 April 2016

G7102 FIRMWARE


Follow these steps to enter Download Mode/Odin Mode
  1. Power off your device
  2. Press and hold Volume Down key, Home Key and Power Key
  3. When your device vibrates, release Power key while keep holding the Volume Down key and Home key
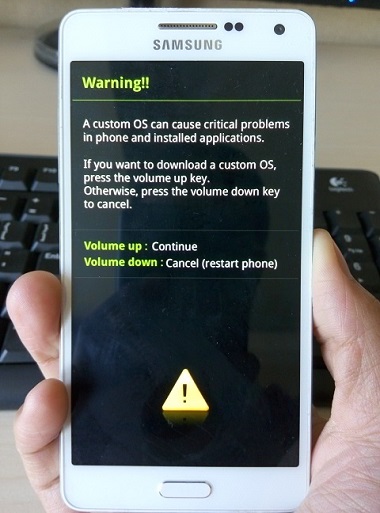
  4. Boot into download mode
    Warning before entering into download mode
  5. Press Volume Up key to enter Download mode, which has a green robot figure and “Downloading… Do not turn off target!!)
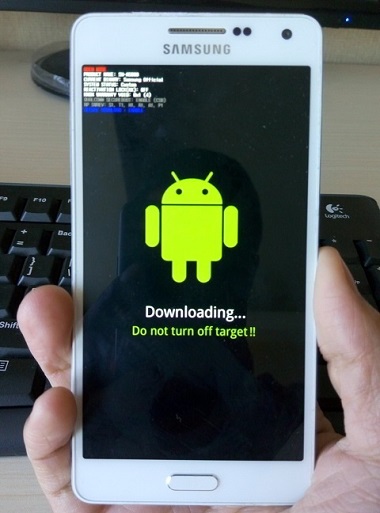
  6. Boot into download mode
    Now you are in download mode.
Step 5: Connect your device to PC.
You device should be automatically recognized by Odin. At the lower-left of Odin interface, it should show a message that says "Added!" and in the meantime you should see a light-blue box at the ID:COM section stating "COM:3" (the number depend on which USB port you have plugged the device cable and is irrelevant).
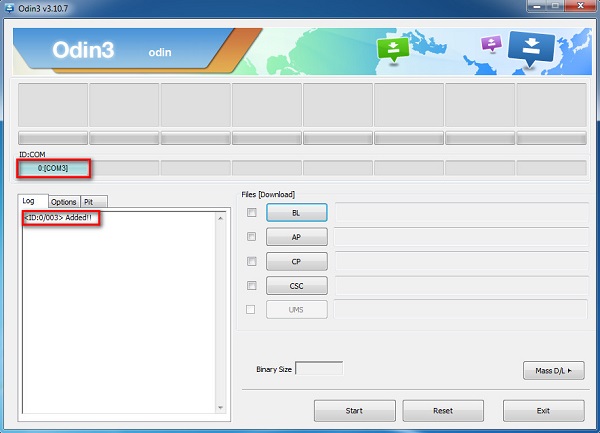
Connect device to Odin
Device is connected to Odin.
Step 6: Click "PDA" or "AP" to add tar.md5 file that you have extracted and then "Start".
Whether it is "PDA" or "AP" depends on the version of Odin that you used. But the md5 file goes to either "PDA" or "AP".
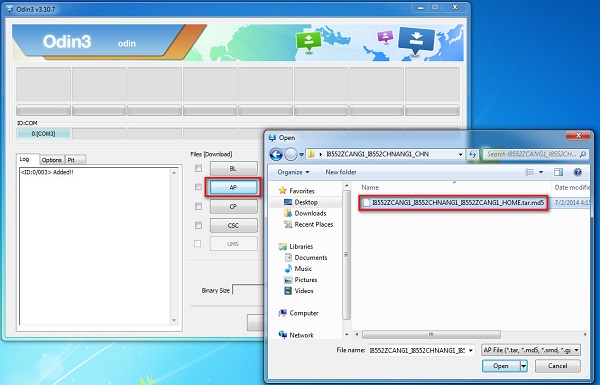
Add md5 file to Odin
Add *.md5 to Odin.
After adding the file, click "Start" to begin the flashing process.
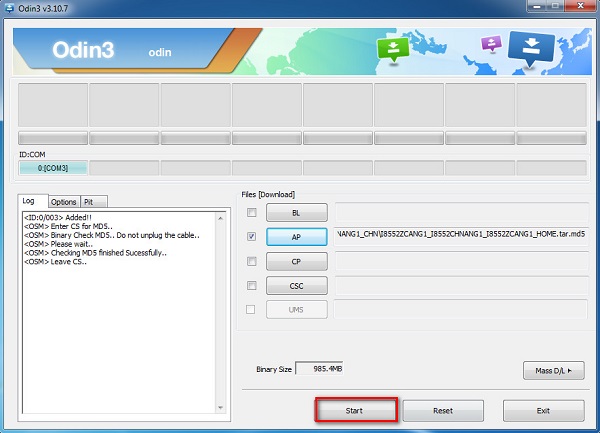
Click start to flash stock rom
Click "Start" to flash.
WARNING DO NOT REMOVE OR OPERATE ON YOUR DEVICE UNTIL FINISHED OR FAILED IS SHOWED ON ODIN.
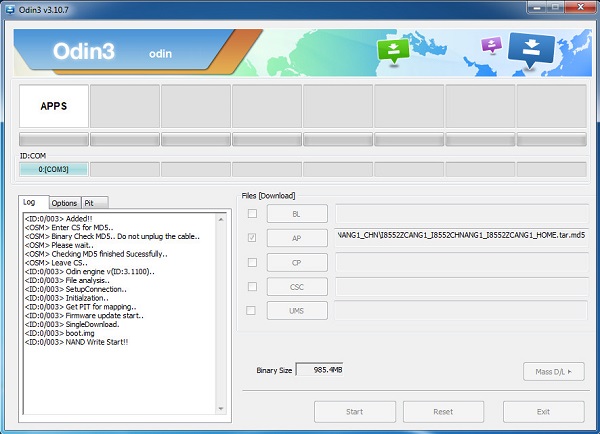
Starting to flash stock rom via Odin
Ongoing flashing process. Do not remove your device.
When the flashing process is done and if everything goes well, you should see a big green box saying "RESET" or "PASSED" (depends on the version of Odin is used). By now, the device should be rebooted and it is safe to remove/unplug your device.
Succeed to flash stock rom via Odin
Flash succeeded.

Any problem during update please ask me..                                                 ziashaheen  


G900A FIRMWARE


Follow these steps to enter Download Mode/Odin Mode
  1. Power off your device
  2. Press and hold Volume Down key, Home Key and Power Key
  3. When your device vibrates, release Power key while keep holding the Volume Down key and Home key
  4. Boot into download mode
    Warning before entering into download mode
  5. Press Volume Up key to enter Download mode, which has a green robot figure and “Downloading… Do not turn off target!!)
  6. Boot into download mode
    Now you are in download mode.
Step 5: Connect your device to PC.
You device should be automatically recognized by Odin. At the lower-left of Odin interface, it should show a message that says "Added!" and in the meantime you should see a light-blue box at the ID:COM section stating "COM:3" (the number depend on which USB port you have plugged the device cable and is irrelevant).
Connect device to Odin
Device is connected to Odin.
Step 6: Click "PDA" or "AP" to add tar.md5 file that you have extracted and then "Start".
Whether it is "PDA" or "AP" depends on the version of Odin that you used. But the md5 file goes to either "PDA" or "AP".
Add md5 file to Odin
Add *.md5 to Odin.
After adding the file, click "Start" to begin the flashing process.
Click start to flash stock rom
Click "Start" to flash.
WARNING DO NOT REMOVE OR OPERATE ON YOUR DEVICE UNTIL FINISHED OR FAILED IS SHOWED ON ODIN.
Starting to flash stock rom via Odin
Ongoing flashing process. Do not remove your device.
When the flashing process is done and if everything goes well, you should see a big green box saying "RESET" or "PASSED" (depends on the version of Odin is used). By now, the device should be rebooted and it is safe to remove/unplug your device.
Succeed to flash stock rom via Odin
Flash succeeded.

Any problem during update please ask me..                                                 ziashaheen  


N8000 FIRMWARE


Follow these steps to enter Download Mode/Odin Mode
  1. Power off your device
  2. Press and hold Volume Down key, Home Key and Power Key
  3. When your device vibrates, release Power key while keep holding the Volume Down key and Home key
  4. Boot into download mode
    Warning before entering into download mode
  5. Press Volume Up key to enter Download mode, which has a green robot figure and “Downloading… Do not turn off target!!)
  6. Boot into download mode
    Now you are in download mode.
Step 5: Connect your device to PC.
You device should be automatically recognized by Odin. At the lower-left of Odin interface, it should show a message that says "Added!" and in the meantime you should see a light-blue box at the ID:COM section stating "COM:3" (the number depend on which USB port you have plugged the device cable and is irrelevant).
Connect device to Odin
Device is connected to Odin.
Step 6: Click "PDA" or "AP" to add tar.md5 file that you have extracted and then "Start".
Whether it is "PDA" or "AP" depends on the version of Odin that you used. But the md5 file goes to either "PDA" or "AP".
Add md5 file to Odin
Add *.md5 to Odin.
After adding the file, click "Start" to begin the flashing process.
Click start to flash stock rom
Click "Start" to flash.
WARNING DO NOT REMOVE OR OPERATE ON YOUR DEVICE UNTIL FINISHED OR FAILED IS SHOWED ON ODIN.
Starting to flash stock rom via Odin
Ongoing flashing process. Do not remove your device.
When the flashing process is done and if everything goes well, you should see a big green box saying "RESET" or "PASSED" (depends on the version of Odin is used). By now, the device should be rebooted and it is safe to remove/unplug your device.
Succeed to flash stock rom via Odin
Flash succeeded.

Any problem during update please ask me..                                                 ziashaheen  


N910F FIRMWARE


Follow these steps to enter Download Mode/Odin Mode
  1. Power off your device
  2. Press and hold Volume Down key, Home Key and Power Key
  3. When your device vibrates, release Power key while keep holding the Volume Down key and Home key
  4. Boot into download mode
    Warning before entering into download mode
  5. Press Volume Up key to enter Download mode, which has a green robot figure and “Downloading… Do not turn off target!!)
  6. Boot into download mode
    Now you are in download mode.
Step 5: Connect your device to PC.
You device should be automatically recognized by Odin. At the lower-left of Odin interface, it should show a message that says "Added!" and in the meantime you should see a light-blue box at the ID:COM section stating "COM:3" (the number depend on which USB port you have plugged the device cable and is irrelevant).
Connect device to Odin
Device is connected to Odin.
Step 6: Click "PDA" or "AP" to add tar.md5 file that you have extracted and then "Start".
Whether it is "PDA" or "AP" depends on the version of Odin that you used. But the md5 file goes to either "PDA" or "AP".
Add md5 file to Odin
Add *.md5 to Odin.
After adding the file, click "Start" to begin the flashing process.
Click start to flash stock rom
Click "Start" to flash.
WARNING DO NOT REMOVE OR OPERATE ON YOUR DEVICE UNTIL FINISHED OR FAILED IS SHOWED ON ODIN.
Starting to flash stock rom via Odin
Ongoing flashing process. Do not remove your device.
When the flashing process is done and if everything goes well, you should see a big green box saying "RESET" or "PASSED" (depends on the version of Odin is used). By now, the device should be rebooted and it is safe to remove/unplug your device.
Succeed to flash stock rom via Odin
Flash succeeded.

Any problem during update please ask me..                                                 ziashaheen  

I9515 FIRMWARE


Follow these steps to enter Download Mode/Odin Mode
  1. Power off your device
  2. Press and hold Volume Down key, Home Key and Power Key
  3. When your device vibrates, release Power key while keep holding the Volume Down key and Home key
  4. Boot into download mode
    Warning before entering into download mode
  5. Press Volume Up key to enter Download mode, which has a green robot figure and “Downloading… Do not turn off target!!)
  6. Boot into download mode
    Now you are in download mode.
Step 5: Connect your device to PC.
You device should be automatically recognized by Odin. At the lower-left of Odin interface, it should show a message that says "Added!" and in the meantime you should see a light-blue box at the ID:COM section stating "COM:3" (the number depend on which USB port you have plugged the device cable and is irrelevant).
Connect device to Odin
Device is connected to Odin.
Step 6: Click "PDA" or "AP" to add tar.md5 file that you have extracted and then "Start".
Whether it is "PDA" or "AP" depends on the version of Odin that you used. But the md5 file goes to either "PDA" or "AP".
Add md5 file to Odin
Add *.md5 to Odin.
After adding the file, click "Start" to begin the flashing process.
Click start to flash stock rom
Click "Start" to flash.
WARNING DO NOT REMOVE OR OPERATE ON YOUR DEVICE UNTIL FINISHED OR FAILED IS SHOWED ON ODIN.
Starting to flash stock rom via Odin
Ongoing flashing process. Do not remove your device.
When the flashing process is done and if everything goes well, you should see a big green box saying "RESET" or "PASSED" (depends on the version of Odin is used). By now, the device should be rebooted and it is safe to remove/unplug your device.
Succeed to flash stock rom via Odin
Flash succeeded.

Any problem during update please ask me..                                                 ziashaheen  


Wednesday, 20 April 2016

G313H FIRMWARE


Follow these steps to enter Download Mode/Odin Mode
  1. Power off your device
  2. Press and hold Volume Down key, Home Key and Power Key
  3. When your device vibrates, release Power key while keep holding the Volume Down key and Home key
  4. Boot into download mode
    Warning before entering into download mode
  5. Press Volume Up key to enter Download mode, which has a green robot figure and “Downloading… Do not turn off target!!)
  6. Boot into download mode
    Now you are in download mode.
Step 5: Connect your device to PC.
You device should be automatically recognized by Odin. At the lower-left of Odin interface, it should show a message that says "Added!" and in the meantime you should see a light-blue box at the ID:COM section stating "COM:3" (the number depend on which USB port you have plugged the device cable and is irrelevant).
Connect device to Odin
Device is connected to Odin.
Step 6: Click "PDA" or "AP" to add tar.md5 file that you have extracted and then "Start".
Whether it is "PDA" or "AP" depends on the version of Odin that you used. But the md5 file goes to either "PDA" or "AP".
Add md5 file to Odin
Add *.md5 to Odin.
After adding the file, click "Start" to begin the flashing process.
Click start to flash stock rom
Click "Start" to flash.
WARNING DO NOT REMOVE OR OPERATE ON YOUR DEVICE UNTIL FINISHED OR FAILED IS SHOWED ON ODIN.
Starting to flash stock rom via Odin
Ongoing flashing process. Do not remove your device.
When the flashing process is done and if everything goes well, you should see a big green box saying "RESET" or "PASSED" (depends on the version of Odin is used). By now, the device should be rebooted and it is safe to remove/unplug your device.
Succeed to flash stock rom via Odin
Flash succeeded.

Any problem during update please ask me..                                                 ziashaheen  

I9003 FIRMWARE


Follow these steps to enter Download Mode/Odin Mode
  1. Power off your device
  2. Press and hold Volume Down key, Home Key and Power Key
  3. When your device vibrates, release Power key while keep holding the Volume Down key and Home key
  4. Boot into download mode
    Warning before entering into download mode
  5. Press Volume Up key to enter Download mode, which has a green robot figure and “Downloading… Do not turn off target!!)
  6. Boot into download mode
    Now you are in download mode.
Step 5: Connect your device to PC.
You device should be automatically recognized by Odin. At the lower-left of Odin interface, it should show a message that says "Added!" and in the meantime you should see a light-blue box at the ID:COM section stating "COM:3" (the number depend on which USB port you have plugged the device cable and is irrelevant).
Connect device to Odin
Device is connected to Odin.
Step 6: Click "PDA" or "AP" to add tar.md5 file that you have extracted and then "Start".
Whether it is "PDA" or "AP" depends on the version of Odin that you used. But the md5 file goes to either "PDA" or "AP".
Add md5 file to Odin
Add *.md5 to Odin.
After adding the file, click "Start" to begin the flashing process.
Click start to flash stock rom
Click "Start" to flash.
WARNING DO NOT REMOVE OR OPERATE ON YOUR DEVICE UNTIL FINISHED OR FAILED IS SHOWED ON ODIN.
Starting to flash stock rom via Odin
Ongoing flashing process. Do not remove your device.
When the flashing process is done and if everything goes well, you should see a big green box saying "RESET" or "PASSED" (depends on the version of Odin is used). By now, the device should be rebooted and it is safe to remove/unplug your device.
Succeed to flash stock rom via Odin
Flash succeeded.

Any problem during update please ask me..                                                 ziashaheen